Monday 9 July 2012

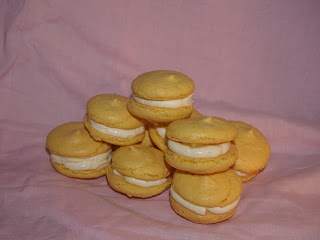
The difference between Macarons and Macaroons


So many people get mixed up between Macarons and Macaroons. I decided I would post this photo to show the difference between the two. 
Hopefully my next batch of macarons turn out well so I can have my first really successful macaron shells! I will hopefully (If they turn out well!) be posting an apple and cinnamon macaron recipe. Keep baking my friends! Comment your flavour ideas for more macarons! 


Tuesday 26 June 2012

Red Velvet Macarons

So I've been thinking up new flavours over the past couple of days and this is one of the ideas I came up with... Red Velvet Macarons! Any of you Red Velvet Cupcake lovers out there will love these macarons. The Cream Cheese filling is to die for! It was so tempting just to eat it straight out of the bowl! I'll post a macaron Do's and Dont's page soon and I'll be adding to that whenever I find new tips. Hopefully that will help all new Macaron Makers (and me too!). So here's my recipe for Red Velvet Macarons with Cream Cheese Filling.
You can see that this batch has cracks in it :( I'll give some tips on how to prevent that)

Red Velvet Macarons: 


  • 75 g almond meal 
  • 100 g Icing sugar
  • 2 tbls cocoa powder
  • 2 egg whites
  • 50 g Castor sugar
  • Red food colouring
  1. Place the almond meal, cocoa powder and icing sugar (confectioners sugar) into a food processor and process for 15 seconds. Sift the mixture into a bowl. Line 2 baking trays with baking paper.
  2. Place the egg whites in a large bowl and whisk until holding soft peaks. Gradually whisk in the caster sugar (about 1 tbls at a time) to make a firm, glossy meringue. Whisk in enough food colouring to give a vibrant red colour (It needs to be really red so that it doesn't go brown)
  3. Using a spatula, fold in the almond/icing sugar/cocoa powder mixture into the meringue, one third at a time. When all the dry ingredients are thoroughly incorporated, continue to cut and fold the mixture until it forms a shiny batter with a thick, ribbon-like consistency.
  4. Pour the mixture into a piping bag fitted with a 1-cm/ 1/2-inch plain nozzle. Pipe an even amount of small rounds onto the prepared baking trays. Tap the baking sheets firmly onto a work surface to remove air bubbles. Leave at room temperature for 30-60 minutes or until a thin skin forms on the top of the shells. Preheat the oven to 150 °C/ 302 °F/Gas Mark 3.
  5. Bake in the preheated oven for 10-15 minutes. Cool for 10 minutes, then carefully peel the macarons off the baking paper. Leave to cool completely on a wire rack.

Cream Cheese Filling:

  • 60 g cream cheese
  • 60 g butter
  • 1 1/4 cup icing sugar
  • 1 tsp vanilla essence

  1.  Beat butter and cream cheese until smooth
  2. Add the icing sugar and vanilla essence
  3. Put into a piping bag and pipe the filling onto 1 half of the shells. Then sandwich with a matching shell
  4. Leave in the fridge for a few hours for the flavours to infuse.
  5. Enjoy!

Tip of the Day

  • Dont use liquid food colouring! Use food colouring paste. Liquid changes the consistency and wont form a skin which means no feet and cracks!

Tuesday 12 June 2012

Raspberry Ripple Macarons


 Yes, another macaron recipe. Make sure you don't over whip the cream for the filling otherwise its not as nice. As Adriano Zumbo says, Eat Sweet and Keep Baking!

Raspberry Ripple Macarons:

(Gluten Free)

  • 75 g ground almonds or almond meal
  • 115 g icing sugar (confectioners sugar)
  • 2 large egg whites
  • 50 g Caster sugar
  • pink food colouring paste 

  1. Place the ground almonds/almond meal and icing sugar (confectioners sugar) into a food processor and process for 15 seconds. Sift the mixture into a bowl. Line 2 baking trays with baking paper.
  2. Place the egg whites in a large bowl and whisk until holding soft peaks. Gradually whisk in the caster sugar (about 1 tbls at a time) to make a firm, glossy meringue. Whisk in enough food colouring to give a baby pink colour.
  3. Using a spatula, fold in the almond/icing sugar mixture into the meringue, one third at a time. When all the dry ingredients are thoroughly incorporated, continue to cut and fold the mixture until it forms a shiny batter with a thick, ribbon-like consistency.
  4. Pour the mixture into a piping bag fitted with a 1-cm/ 1/2-inch plain nozzle. Pipe an even amount of small rounds onto the prepared baking trays. Tap the baking sheets firmly onto a work surface to remove air bubbles. Swirl a little bit of pink food colouring on the top of each macaron shell. Leave at room temperature for 30 minutes or until a thin skin forms on the top of the shells and you can gently glide your finger across the top of them. Preheat the oven to 150 °C/ 302 °F/Gas Mark 3.
  5. Bake in the preheated oven for 10-15 minutes. Cool for 10 minutes, then carefully peel the macarons off the baking paper. Leave to cool completely on a wire rack.


Raspberry Ripple Macaron Filling:


  • 150 ml double cream
  • 1 tbsp vanilla essence/extract
  • 100% raspberry jam
  1. Whip the double cream and the vanilla essence until holding soft peaks.
  2. Sandwich two matching macaron shells together with Whipped cream and strawberry jam.

Saturday 9 June 2012

Strawberry Cheesecake Macarons


 Strawberry Cheesecake Macarons:

(Gluten Free)

  • 75 g ground almonds or almond meal
  • 115 g icing sugar (confectioners sugar)
  • 2 large egg whites
  • 50 g Caster sugar
  • pink food colouring paste 

  1. Place the ground almonds/almond meal and icing sugar (confectioners sugar) into a food processor and process for 15 seconds. Sift the mixture into a bowl. Line 2 baking trays with baking paper.
  2. Place the egg whites in a large bowl and whisk until holding soft peaks. Gradually whisk in the caster sugar (about 1 tbls at a time) to make a firm, glossy meringue. Whisk in enough food colouring to give a baby pink colour.
  3. Using a spatula, fold in the almond/icing sugar mixture into the meringue, one third at a time. When all the dry ingredients are thoroughly incorporated, continue to cut and fold the mixture until it forms a shiny batter with a thick, ribbon-like consistency.
  4. Pour the mixture into a piping bag fitted with a 1-cm/ 1/2-inch plain nozzle. Pipe an even amount of small rounds onto the prepared baking trays. Tap the baking sheets firmly onto a work surface to remove air bubbles. Leave at room temperature for 30 minutes or until a thin skin forms on the top of the shells. Preheat the oven to 150 °C/ 302 °F/Gas Mark 3.
  5. Bake in the preheated oven for 10-15 minutes. Cool for 10 minutes, then carefully peel the macarons off the baking paper. Leave to cool completely on a wire rack.

 Strawberry Cheesecake Filling:

  • 160 grams/5.64 ounces Cream cheese block
  • 1 1/2 tbls cream
  • A squeeze of lemon juice
  • 1/3 cup caster sugar
  • Strawberry jam

  1. Beat cream cheese until smooth. Add cream and continue beating.
  2. Add the squeeze of lemon juice and the caster sugar until smooth.
  3. Fill a piping bag with the cheesecake filling and pipe onto half the macaron shells.
  4. Put a dollop of strawberry jam onto the cheesecake mixture and sandwich a second macaron shell on top. 
Leave the macarons in the fridge for a few hours to let the flavours infuse.

Friday 8 June 2012

Lemon Cheesecake Macarons!


Macarons are officially my favourite thing to bake! There are infinite flavour combinations. They aren't as hard to make as some people say they are. So, here's my recipe to Lemon Cheesecake Macarons

Lemon Cheesecake Macarons:

(Gluten Free)

  • 75 g ground almonds or almond meal
  • 115 g icing sugar (confectioners sugar)
  • 2 large egg whites
  • 50 g Caster sugar
  • finely grated rind of 1/2 lemon
  • Yellow food colouring paste 

  1. Place the ground almonds/almond meal and icing sugar (confectioners sugar) into a food processor and process for 15 seconds. Sift the mixture into a bowl. Line 2 baking trays with baking paper.
  2. Place the egg whites in a large bowl and whisk until holding soft peaks. Gradually whisk in the caster sugar (about 1 tbls at a time) to make a firm, glossy meringue. Whisk in the lemon rind and enough food colouring to give a bright yellow colour.
  3. Using a spatula, fold in the almond/icing sugar mixture into the meringue, one third at a time. When all the dry ingredients are thoroughly incorporated, continue to cut and fold the mixture until it forms a shiny batter with a thick, ribbon-like consistency.
  4. Pour the mixture into a piping bag fitted with a 1-cm/ 1/2-inch plain nozzle. Pipe an even amount of small rounds onto the prepared baking trays. Tap the baking sheets firmly onto a work surface to remove air bubbles. Leave at room temperature for 30 minutes or until a thin skin forms on the top of the shells. Preheat the oven to 150 °C/ 302 °F/Gas Mark 3.
  5. Bake in the preheated oven for 10-15 minutes. Cool for 10 minutes, then carefully peel the macarons off the baking paper. Leave to cool completely on a wire rack.

Lemon Cheesecake Filling:

  • 125 g Cream cheese block
  • 1 1/2 tbls cream
  • 1/4 cup caster sugar
  • Lemon curd
  1. Put cream cheese into a large mixing bowl and beat until smooth.
  2. Pour the cream into bowl and continue beating
  3. Add the sugar and continue beating until smooth
  4. Pair the macaron shells together so they match. Spoon the cheesecake filling into a piping bag with a star or plain nozzle. 
  5. Pipe the Cheesecake filling onto half the macaron shells.
  6. Put a small dollop of lemon curd onto the centre of the cheesecake filling and put the top of the macaron shells on the filling.


Tips:


  • Leave the filled macarons in the fridge for 24 hours to make them taste even better
  • You can freeze the unfilled macaron shells in the freezer for up to 1 month
  • Almond flour and Almond meal are the same things
  • If the shells crack, turn the temperature down slightly

Wednesday 6 June 2012

Cake Pops!

 
Whats better than a cupcake? A Cake Pop! These cute little cakes on a stick coated in chocolate are delicious. You can make them with or without a Cake Pop pan and decorate them however you want! Hope you're enjoying my blog and Enjoy these little cakes on sticks!
Some of my decorated Cake Pops

 To make Cake Pops:

  • 1 cake mix
  • An extra egg
  • Cake Pop pan
  1.  Grease Cake Pop pan and preheat oven according to cake mix instructions.
  2. Make cake mixture according to instructions, adding in an extra egg to help make the cake more dense.
  3. Pour the Cake mixture into the Cake Pop pan and put into preheated oven.
  4. Leave the cakes in the pan until the pan has fully cooled, then, take Cake Pops out of the pan and onto a wire rack to cool.
  5. To make Cake Pops more crispy you can put the cake balls onto a cookie tray and bake for a few more minutes.

Alternative (no Cake Pop pan):

  • 1 already made cake 
  • 2 cups of Frosting (any flavour you like)
  1. Break up the cake in a food processor until the cake is just crumbs.
  2. Put the cake crumbs into a bowl and add 2 cups of frosting. 
  3. Use your hands to mix the frosting and cake crumbs together.
  4. Form your cake mixture into small balls (About 2-3 tablespoons each). 
  5. Once you have formed all your Pops, put them into the fridge for about and hour or so or the freezer for about 30 minutes.


 Decorating the Cake Pops:

There are so many different ways to decorate Cake Pops. You can use chocolate, sprinkles, frosting, fondant, anything that will stick the the pop works! 
Here are some other Cake Pops that I found on the internet:
Mr Potato Head by Bakerella

Muppets by Bakerella


Penguins by Cake Pops by Bakerella

Pooh-Bear by Cake Pops by Bakerella

Sheep by Lost At E Minor

But for my Chocolate coated Cake Pops you will need:

  • Chocolate (Any type that you like) 
  • Lollipop sticks
  • Food colouring to colour white chocolate (optional)
  1. Melt the chocolate. You need quite a lot depending on how many Cake Pops you have. Dip about a cm of the lollipop stick into the chocolate and push into the center of the Cake Pop. Put into the fridge or freezer to set. 
  2. Melt more chocolate and colour it to your liking. Dip the Cake Pop into the chocolate until covered. Put into the fridge or freezer to set.
  3. Using a toothpick/skewer, dip the skewer into chocolate and decorate the Cake Pops however you like. 
  4. Leave to set in the fridge and enjoy!
Some interesting lighting :)

Tuesday 5 June 2012

Crème brûlée

Hi guys, hope you enjoy my new baking blog! I bake almost every day so there will be lots of yummy posts coming up. Enjoy this delicious Crème brûlée!

Crème brûlée

(Gluten Free)

Serves 6

Preparation Time: 10 mins

Cooking Time: 30 mins

Chilling Time: 4 hours

Ingredients:

  • 2 1/2 cups (625 ml) cream (any cream works)
  • 1 vanilla bean, split
  • 6 egg yolks
  • 1/2 cup (100g) castor sugar
  • Extra brown or castor sugar to serve

 Method:

  1. Preheat oven to 150°C (302°F). Place six ramekin or other ovenproof dishes in a large roasting pan.
  2. Place cream in a medium saucepan. Use a small sharp knife to scrape the seeds from the vanilla bean into the cream. Add the bean to the cream mixture. Place over medium heat and bring to a simmer (do not boil)
  3. Use a whisk to whisk the egg yolks and castor sugar together in a medium bowl until well combined. Gradually whisk the cream into the egg yolk mixture until well combined. Remove and discard the vanilla bean. Pour evenly among the prepared dishes. Pour enough boiling water into the roasting pan to reach halfway up the sides of the dishes.

Use a whisk to whisk the egg yolks and castor sugar together in a medium bowl until well combined
Gradually whisk the cream into the egg yolk mixture until well combined

Pour the mixture into the dishes
4. Bake in a preheated oven for 25-30 minutes or until just set. Remove from oven. Transfer the dishes one an oven tray and set aside for 30 minutes to cool. Then, cover with plastic wrap and place in the fridge for 4 hours to chill.
Put onto a new tray to cool for 30 minutes
5. Sprinkle the brûlées evenly with the sugar. Using a brûlée gun or blow torch caramelise the sugar. You can also put the brûlées under a hot grill until the sugar bubbles and caramelises (this slightly melts the Crème brûlée but still tastes amazing!). Serve immediately.

  
Ready to be cracked open and eaten!